Howdy Folks,
My apologies, I have been AWOL for a little while. Things can start to get a little sketchy around the PG as peak driving season ramps up.
I was recently approached for the 9000th time (at least) about fitting tapered bearing cups into bearing caps, which was my inspiration for this week’s post.
Bearing caps can be a fairly generic term, so let me clarify that I am specifically talking about bearing caps in a Salisbury style axle; which are the majority style of light duty truck axles used today.
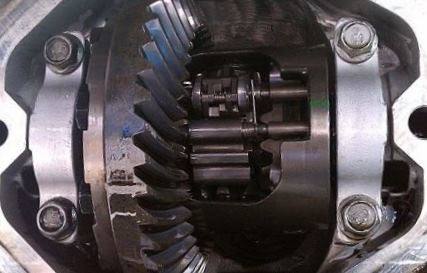
Generally speaking, you don’t want an interference fit on these bearing caps because they will distort and you tighten them down. If only it were that easy! For as long as bearing caps have been around, keeping them round has been the issue. Typically, the caps will be mated to carrier and machined as one assembled pieces. The prevailing theory was that if the cap bolts were tightened down enough so that the cap wouldn’t move during machining; the cap should be able to be removed and reassembled with the same tolerances it was machined to, right? Wrong.
It has been found the after the cap/carrier interface is machined, the measurements may be perfect until you loosen the bolts for the first time. The cap will often contract and give you an out of round cap. There are a couple of theories. I’m of the opinion that the machining operation imparts some compressive stress into the machined surface of the cap which aids in the contraction when the cap is removed.
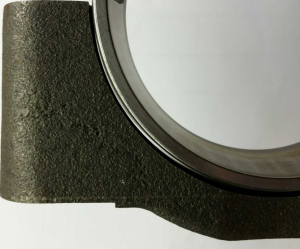
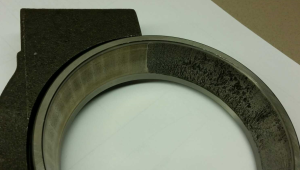
How much does the cap contract? It can be substantial. Substantial enough to fail a bearing at the split line location. Photo 1 below is a cap that was machined to perfection prior to removing the bolts and upon removal measured 120 µm out of round at the split line location; far beyond acceptable tolerances. To make matters worse, the out of round is very localized creating almost an edge at the split line. In testing, this cap wound up failing a bearing cup as the first failure in the axle taking about ½ of the life out of the axle.
For reasons I don’t yet completely understand, this problem seems to be more prevalent in cast iron housings. Aluminum housings don’t seem to exhibit this problem nearly as often as iron housings. It could be because the AL doesn't get as hot during machining, but that is speculation on my part.
We’ll really get into this deeper in a full article, but for now, keep your cap fits light. I like to start off somewhere around a line to line fit. There are occasions, if you are having really bad contraction with heavy loads, you may have to back off farther than that.