Advanced Distortion Control for Case Hardening of Transmission Components
Introduction
Distortion control is one of the major challenges in modern manufacturing. Distorted gear components cause noise in the transmission and may even create problems during transmission assembly. Especially battery-operated electric vehicles (BEV) and other electrified vehicles (such as Hybrids) require a low-noise transmission with high-precision components.
Distortion has a strong cost impact because distorted components often need hard machining after heat treatment. Better control of distortion means:
- less cycle time per part in hard machining,
- less hard-machining capacity needed, and
- less tooling cost for hard machining.
With excellent control of distortion for some applications, hard machining can be eliminated. For some other applications, the need for a cost-intensive press quench can be eliminated if excellent distortion control is established.
Distortion Mechanisms
The plastic deformation of metallic components during heat treatment is called distortion. Distortion occurs if the stress in the material exceeds the yield stress of the material. During case hardening the components are exposed to high temperatures ranging from 880°C to 1.050°C and the yield stress decreases strongly with increasing temperature of a component. Three different types of stress in the material need to be distinguished:
- Residual stresses (they are induced before heat treatment by casting, forging, machining, etc. [Ref. 1]).
- Thermal stresses (they are caused by the temperature gradient while heating and quenching).
- Transformation stresses (they are caused by the transformation from ferrite to austenite during heating and transformation from austenite to martensite/bainite during quenching).
These three types of stresses overlay with each other and add up to the total stress in the component. They are influenced by part geometry, steel grade, casting, forging, machining, etc. and they are influenced by heat treatment. If the total stress in the component exceeds the yield stress, then plastic deformation (distortion) of the component takes place. The chronology and the height of the three types of stresses leading to distortion are dependent on numerous influencing factors, see Figure 1.
When analyzing distortion, it should be distinguished between size change and form change. Size change refers to the homogenous growth or shrinkage of the treated component while maintaining its shape (e.g., the homogenous growth or shrinkage of the diameter or the length of the component). Form change refers to a change in the shape of the part (e.g., roundness of a gear, bending of a gear shaft, or deformation of gear tooth geometry).
All carburized components will have some size change due to a transformation in the microstructure from ferrite into martensite. The size change must be controlled with green machining. For example, if an outside diameter grows 10 microns during heat treatment, it should be machined 10 microns smaller before heat treatment.
There are many different characteristics impacted by form change. However, it helps to better understand form change by simplifying distortion into the two main parameters flatness and roundness.
Form-change for shafts is mainly straightness. When analyzing gears, flatness can be determined by the amount of “helix variation,” or “lead variation.” Roundness is a measurement of “circularity.”
The helix average also changes during heat treatment. The helix average changes in a minus direction, meaning the tooth is unwinding. For instance, the helix angle might be 15 degrees in the green state, but it may change to 14 degrees after heat treatment. This must be compensated for with green machining.
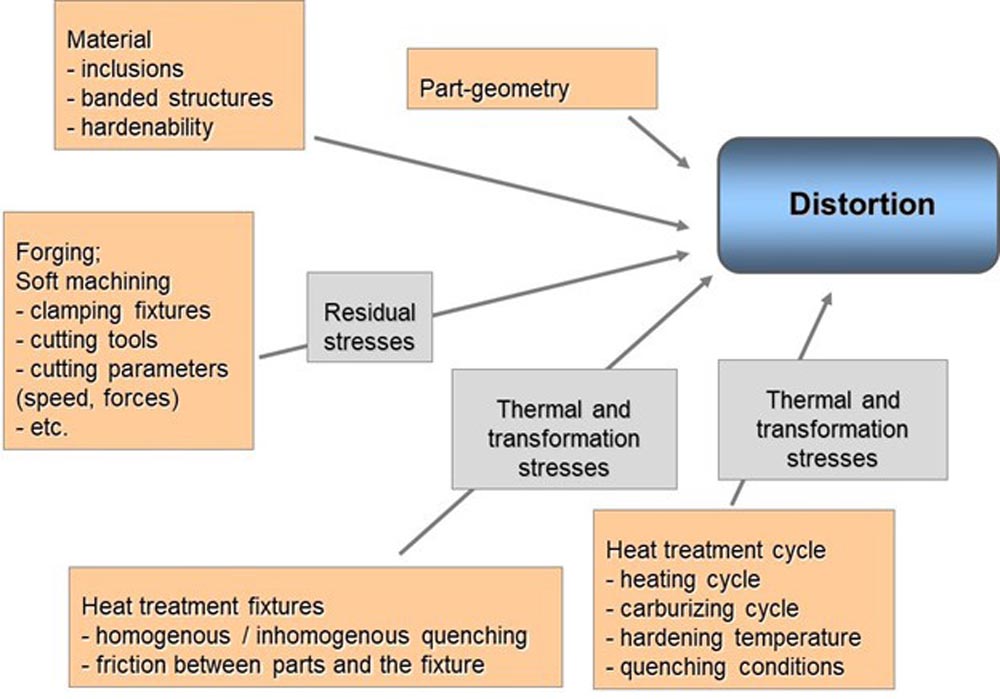
Figure 1—Factors influencing distortion.
Low-Pressure Carburizing in Combination with High-Pressure Gas Quenching
Heat treatment distortion can be significantly reduced by applying the technology of Low-Pressure Carburizing (LPC) and High-Pressure Gas Quenching (HPGQ). LPC is a case-hardening process performed at a pressure of only a few millibars using acetylene as the carbon source. During HPGQ the load is quenched using an inert gas stream instead of a liquid quenching media. Usually, nitrogen or helium are used as quench gas (Refs. 2, 3, 4).
HPGQ offers significant potential to reduce heat treatment distortion. Conventional quenching technologies such as oil or polymer quenching exhibit nonhomogeneous cooling conditions. Three different mechanisms occur during conventional liquid quenching: film-boiling, bubble-boiling, and convection. Resulting from these three mechanisms, the distribution of the local heat transfer coefficients on the surface of the component is very nonhomogeneous. These nonhomogeneous cooling conditions cause high thermal and transformation stresses in the component and subsequently distortion. During HPGQ only convection takes place which results in much more homogenous cooling-conditions, see Figure 2 (Refs. 5, 6). Significant reductions of distortion by substituting Oil-quench with HPGQ have been published (Refs. 7, 8).
Another advantage of HPGQ is the possibility to adjust the quench intensity exactly to the needed severity by choosing quench pressure and quench velocity. Typical quench pressures range from 2 bar to 20 bar. The gas velocity is controlled by a frequency converter. Typical gas velocities range from 2 m/s to 20 m/s. Quench pressure and gas velocity are chosen depending on the part geometry and the steel grade of the component to achieve optimum results.
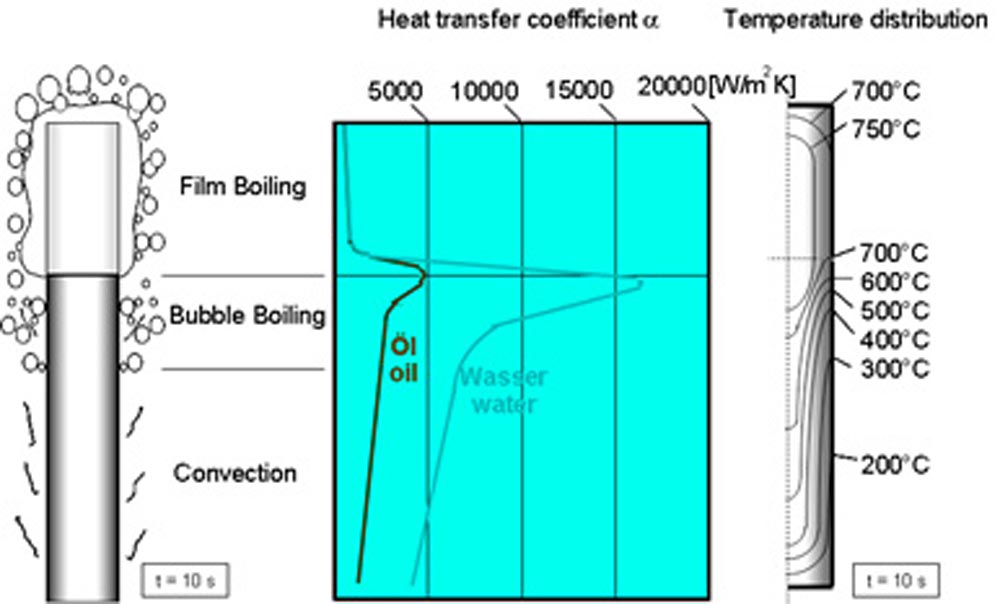
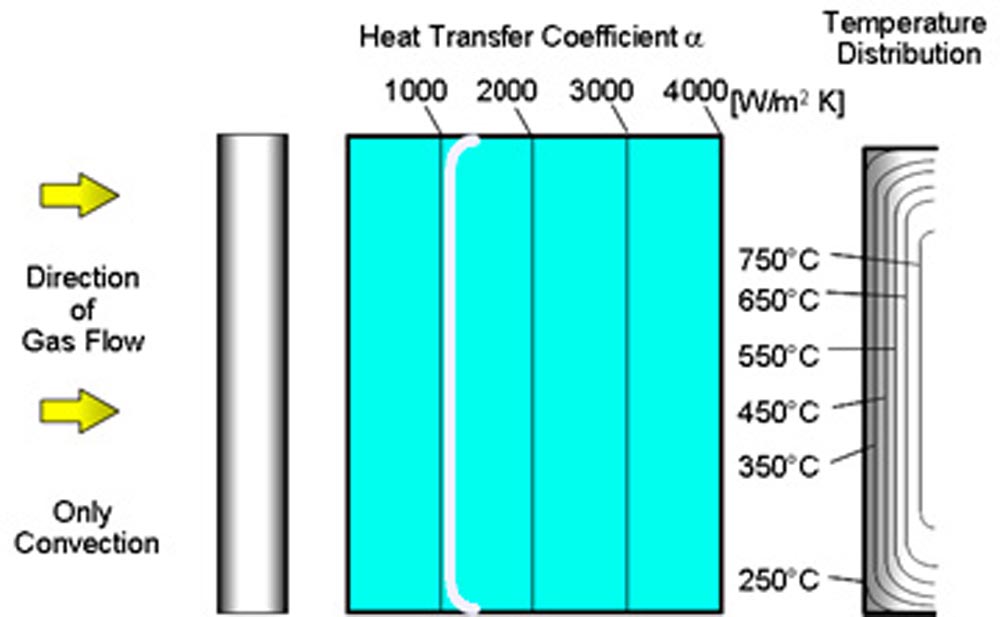
Figure 2—Heat transfer coefficient and temperature-distribution in liquid- and gas-quenching (Ref. 5).
The following equation describes the heat transfer coefficient as a function of gas velocity, density, and type (Ref. 2).

where
C is constant factor (depending on quench cell)
w is gas velocity
ρ is gas density
d is diameter of component
η’ is viscosity of the gas
cp is specific heat capacity of the gas and
λ is thermal conductivity of the gas.
Typical gases applied for HPGQ are nitrogen and helium (Ref. 2). To achieve the required core hardness in gears of low alloyed case hardening steels, helium as a quenching medium and a gas pressure of 20 bar is necessary for many applications.
For many applications it is not the absolute height of distortion causing manufacturing problems but the spread of distortion. The spread of distortion cannot be compensated with green machining. So, for many applications, the challenge is to optimize the HPGQ in such a way that it provides a heat treatment process with very little variation of distortion within a load and over time from load to load.
Strategies for Distortion Control When Applying HPGQ
As described above, the gas quenching process offers two major advantages when compared to liquid quenching in terms of distortion control:
- More homogenous heat transfer coefficient around the surface of the quenched component.
- The flexibility to tailor the quench intensity specifically for the needs of the quenched component.
To fully exploit the benefits of HPGQ it is important to optimize the design of the heat treatment fixtures. The fixture should provide a horizontal loading of the components and should allow a homogenous gas flow around the treated components during quenching as much as possible. Figure 3 shows an example of a fixture made of carbon-reinforced carbon (CFC).
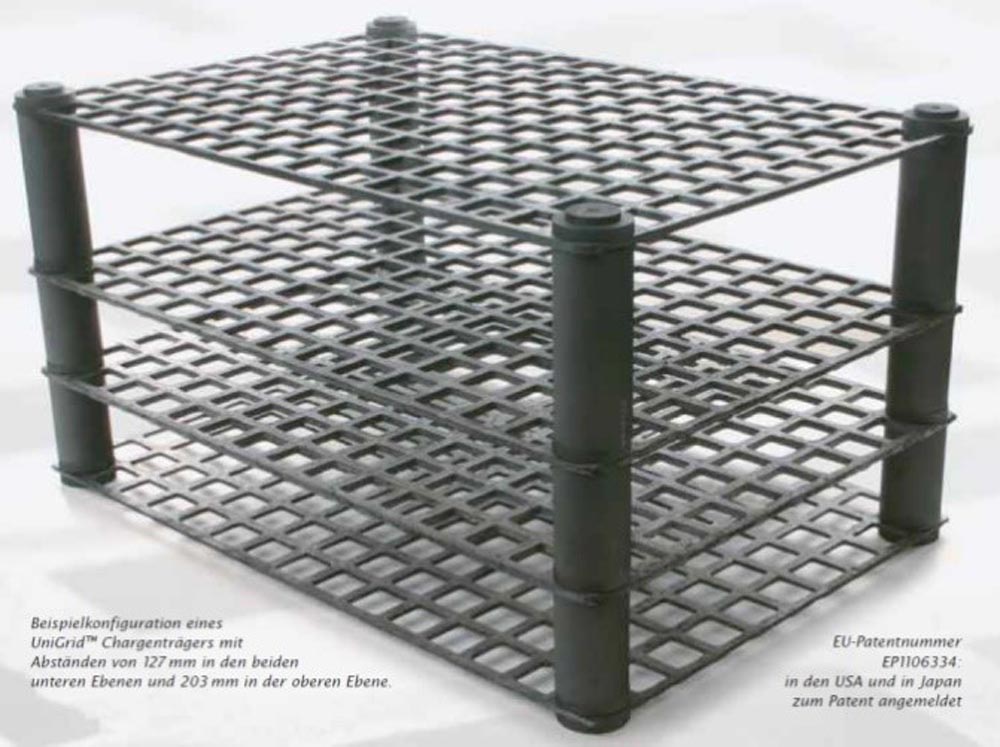
Figure 3—Fixture made of CFC (Source: Schunk GmbH).
In addition, the HPGQ—process offers more options for further reduction of heat treatment distortion. These process modifications are explained in the following.
Dynamic Quenching
Dynamic Quenching is a process where the quenching parameters gas pressure and/or gas flow velocity are stepwise varied during quenching, see Figure 4. This process is typically divided into three steps (Ref. 9):
- High quenching severity until a certain part temperature is reached.
- Quenching severity is reduced for a set time to allow for temperature equalization in the part.
- Quenching severity is increased again until the end of the quenching process.
The control system in the quenching chamber allows to control the different quenching steps of “dynamic quenching” in a very accurate way with good reproducibility. Optimum results are achieved when using helium. The light-quenching gas helium can be decelerated and accelerated very precisely for optimum distortion control.

Figure 4—Schematic illustration of Dynamic Quenching for specimen of different sizes.
The application of Dynamic Quenching leads to a reduction of thermal stresses during quenching and thus it offers the potential to reduce heat treatment distortion for certain applications. In addition, a positive effect on fatigue properties can be achieved as well by applying this process modification.
Reversing Gas Flow
High-pressure gas quenching is typically performed with a flow direction from top to bottom through the load. However modern gas-quenching chambers offer the possibility to reverse the direction of the gas flow during quenching. Reversing gas flow means that the flow of gas is alternated back and forth from top-to-bottom and bottom-to-top. By alternating the gas flow direction, there is less difference in the cooling curves of parts placed in different layers. This reduces the variation of distortion inside the load.
A schematic view of a quench chamber with reversing gas flow is shown in Figure 5. To allow for the alternating flow direction, the chamber is equipped with flaps that are operated pneumatically. Depending on the setting of the valves, either top-to-bottom or bottom-to-top flow direction is put into effect. The alternation of the flow direction is time controlled.
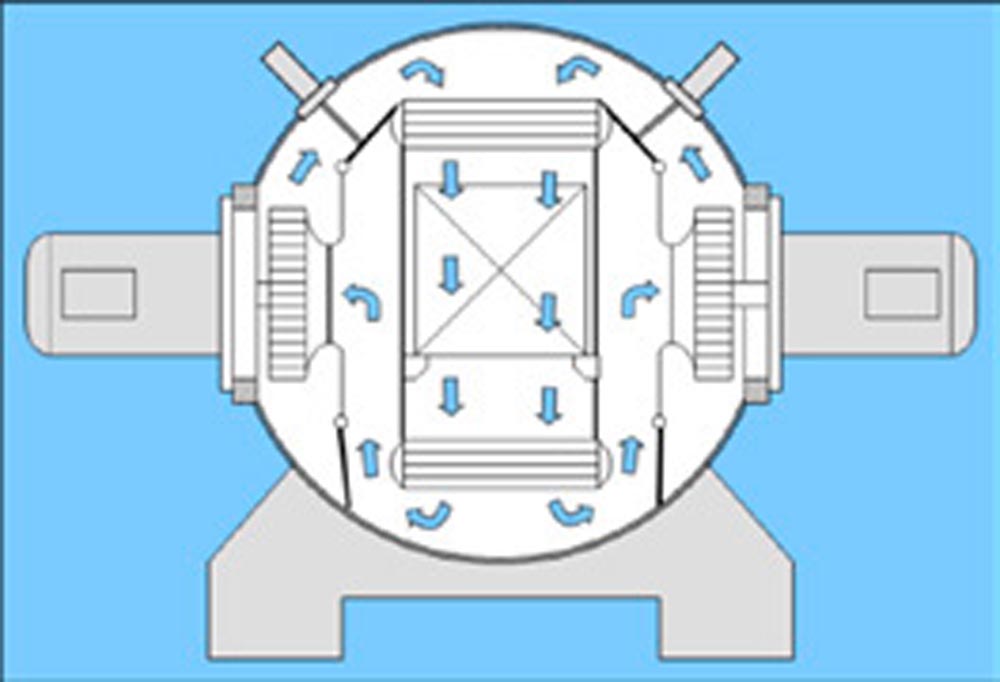
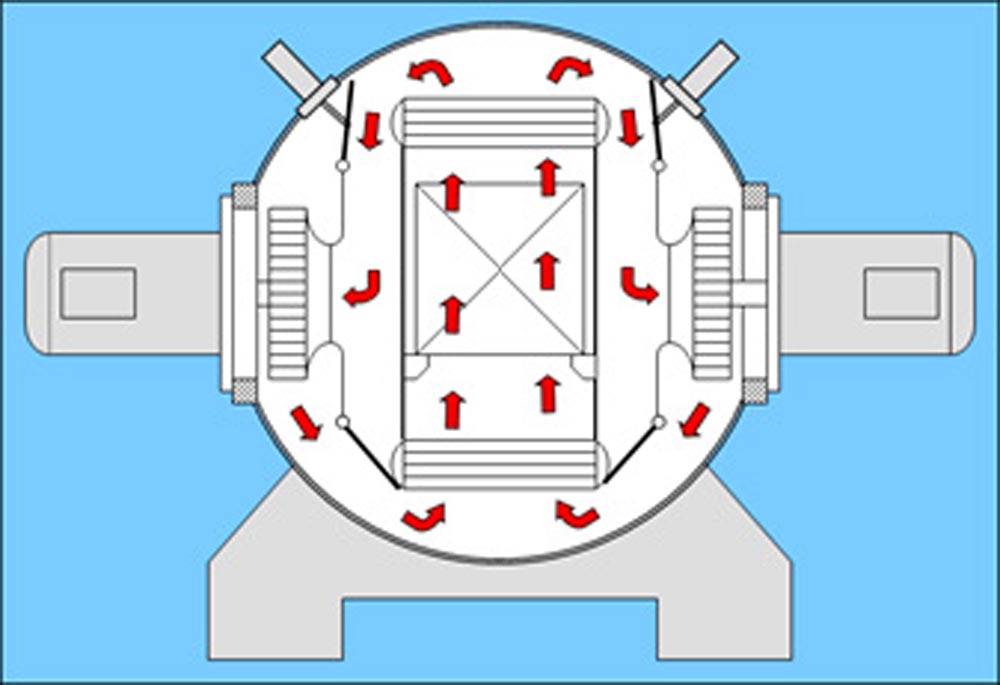
Figure 5—Reversing Gas flow.
Distortion Studies
Comparison of LPC and HPGQ Versus Atmospheric Carburizing and Oil Quench
Sliding gears made of 8620 material used to be carburized in atmosphere and quenched in oil. For this application, the hardenability of 8620 material was too low to allow for gas-quenching. Therefore, the steel grade was changed to 4320H material.
The gears have an outer diameter of 92 mm, an inner diameter of 30 mm, and a height of 24 mm. The specification after heat treatment calls for surface hardness of 58–64 HRC, core hardness of 35.1–43.3 HRC, and case hardening depth CHD at the pitch of 0.75 mm–1.3 mm. The microstructure in the case-hardened layer must consist of a minimum of 90 percent martensite, not more than 10 percent retained austenite, and no bainite.
For a distortion study, one load with gears made of 8620 material was carburized in atmosphere and oil quenched and one load made of 4320H material was low pressure carburized and gas quenched. A picture of the LPC load can be found in Figure 6.
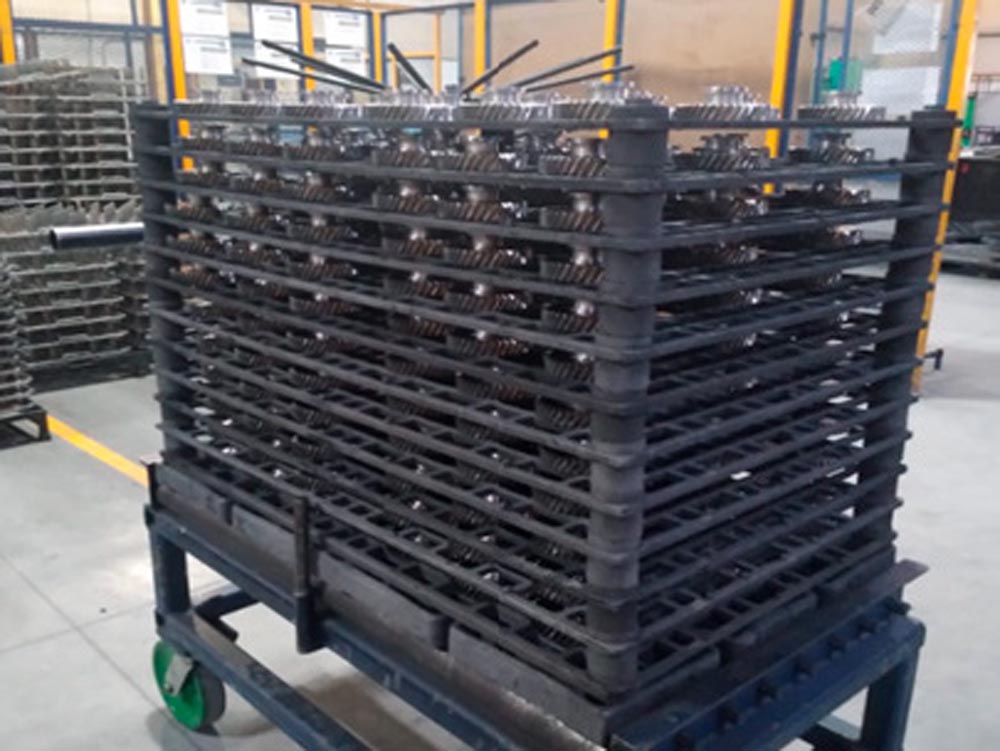
Figure 6—Load of sliding gears (CFC-fixture consisting of 12 layers).
Twenty parts were measured in each load. Figure 7 and Figure 8 show the absolute geometrical values after heat treatment, not the change during heat treatment.
Four teeth are measured per gear. “Helix average” is the average helix value from those 4 teeth of one gear. Figure 7 shows the average values from 20 measured parts of Helix average as well as the maximum and minimum value from those 20 parts for both processes. The spread of “Helix average” is clearly reduced with the LPC and HPGQ—process.

Figure 7—Helix average of sliding gears; comparison of atmospheric carburizing and oil quenching versus LPC and gas quenching.
“Helix variation” is the difference of maximum and minimum helix value from the 4 measured teeth per each gear. Figure 8 shows the average values of “helix variation” from 20 measured parts as well as the maximum and minimum values of “helix variation” from those 20 parts.
The “helix variation” is strongly reduced when applying LPC and HPGQ, see Figure 8. For the left flank, the average “helix variation” is reduced by 59 percent, and for the right flank by 48 percent. When applying LPC and gas quenching, the “helix variation” is safely within the maximum tolerance of 50 microns. This offers significant potential for cost savings in hard machining.
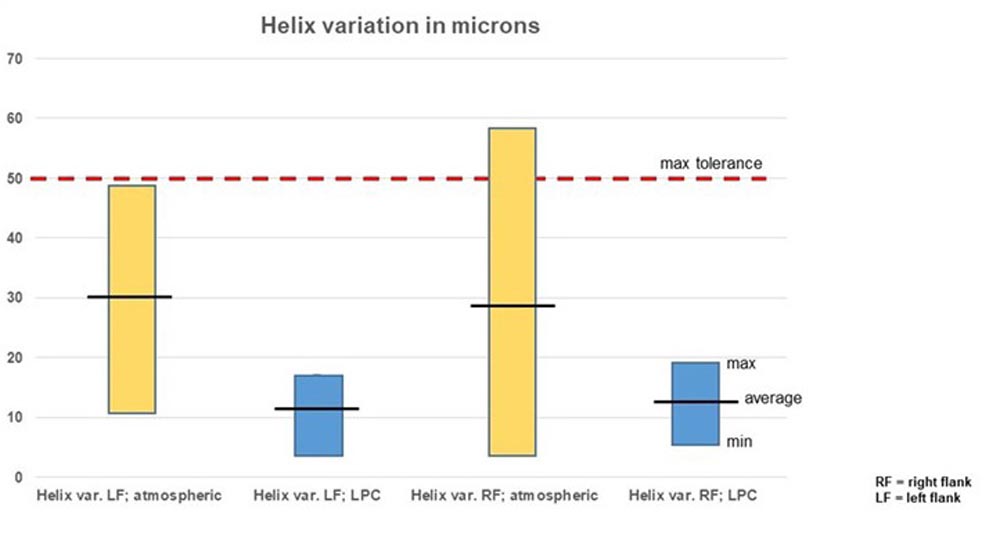
Figure 8—Helix variation of sliding gears; comparison of Atmospheric carburizing and Oil quenching versus LPC and Gas quenching.
Size-Change of Pinion Gears When Applying LPC and HPGQ
The size change of pinion gears was monitored during serial production when applying LPC and HPGQ. The pinion gears are made of SAE 5120H material with an outer diameter of 34 mm, an inner diameter of 20 mm, a height of 15 mm, and a weight of 0.055 kg per part, see Figure 9. The case hardening depth CHD after heat treatment is specified as being from 0.5–0.8 mm.
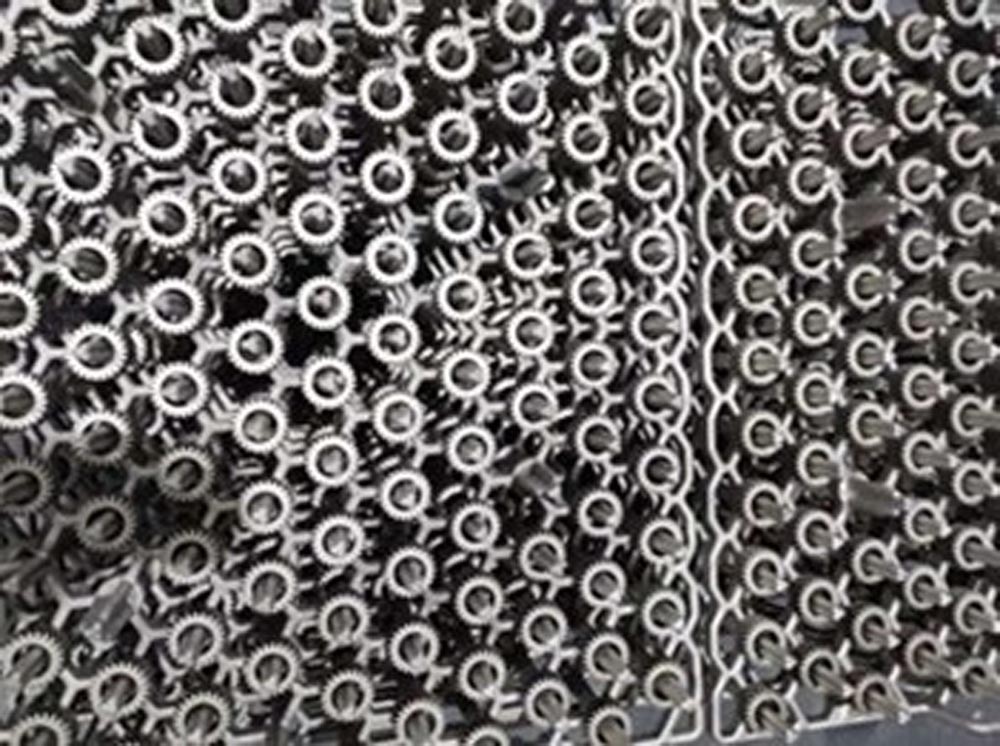
Figure 9—Load for heat treatment of pinion gears made of SAE 5120H material.
Three parts each from 140 production loads were measured. Figure 10 shows the size change of the inner diameter. The inner diameter is shrinking by an average of 39 microns. The shrinking is stable and predictable within a load and from load to load.

Figure 10—Size change of inner diameter of pinion gears after LPC and HPGQ; 3 parts measured each from 140 production loads.
Size-Change of Inner Splines of Gear Shafts When Applying LPC and HPGQ
Gear shafts made of 20CrMnTi material were analyzed regarding shrinking of the inner diameter at the spline. Figure 11 shows the measurement positions.
The shafts have an outer diameter of 48 mm, a height of 233 mm, and a weight of ca. 2.7 kg. The specification after heat treatment calls for a case hardening depth CHD = 0.6–0.9 mm and a surface hardness = 59–63 HRC.
Twenty shafts were analyzed regarding the size change of the inner diameter after applying the process of LPC and gas quenching.
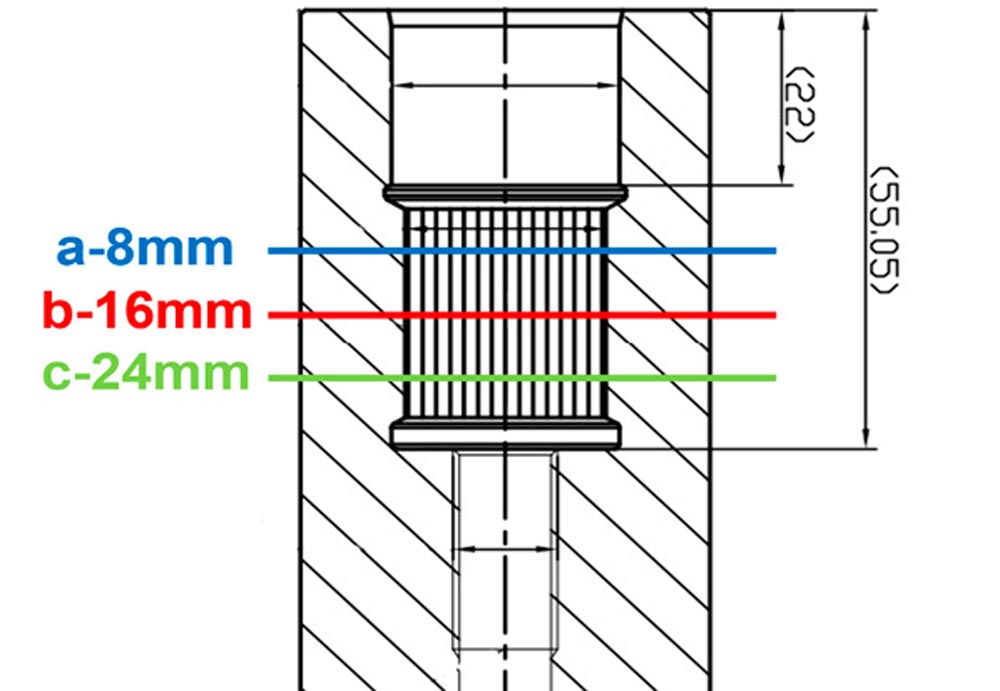
Figure 11—Measurement positions for the inner spline of a gear shaft.
Figure 12 shows the average shrinking and the variation of shrinking at the positions a, b, and c of the inner spline. A homogenous shrinking on the three measurement positions is demonstrated.
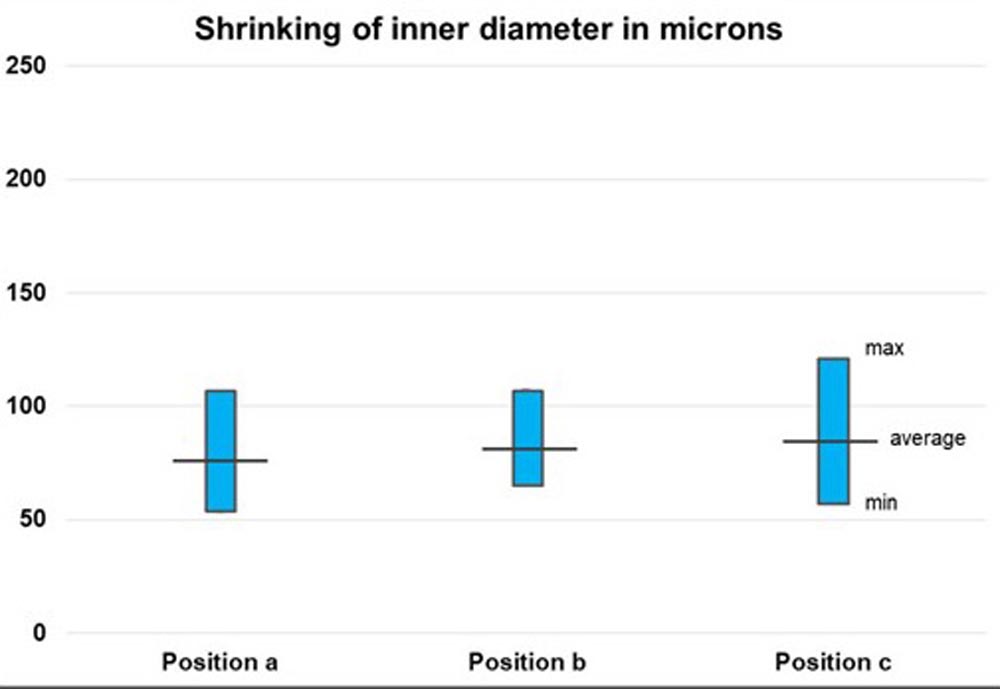
Figure 12—Shrinking of the inner spline of a gear shaft on different positions after LPC and HPGQ.
Optimized Fixturing
Final drive ring gears made of 4121 mod material (see Figure 13) were treated with different designs of fixtures to improve distortion control. The parts have an outer diameter of 226 mm with 59 external teeth, a height of 32 mm, and a weight of ca. 4.2 kg.
The case hardening depth CHD is specified as 0.7–1.1 mm, the surface hardness as 64–69 HR45N, and the core hardness is specified to be above 28 HRC.
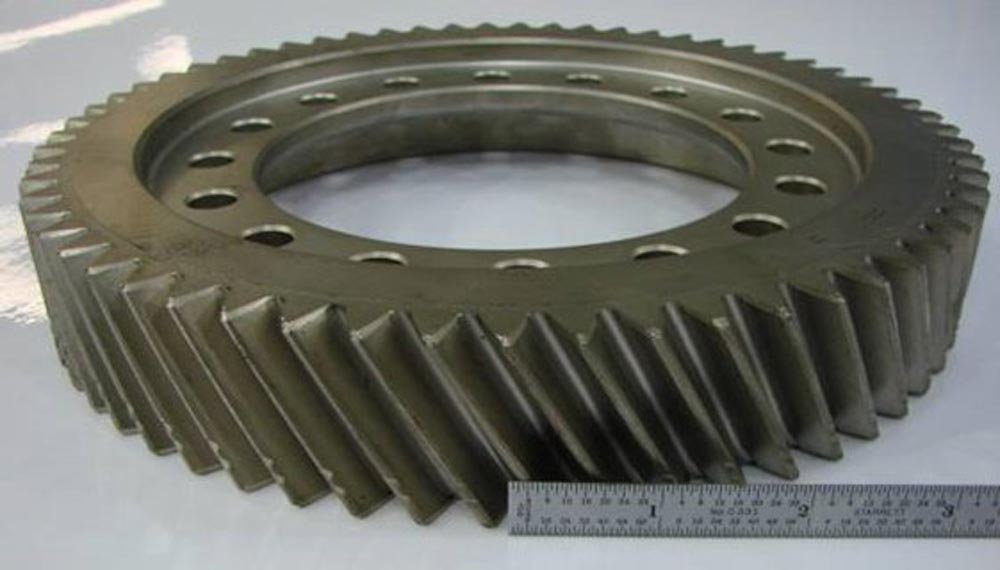
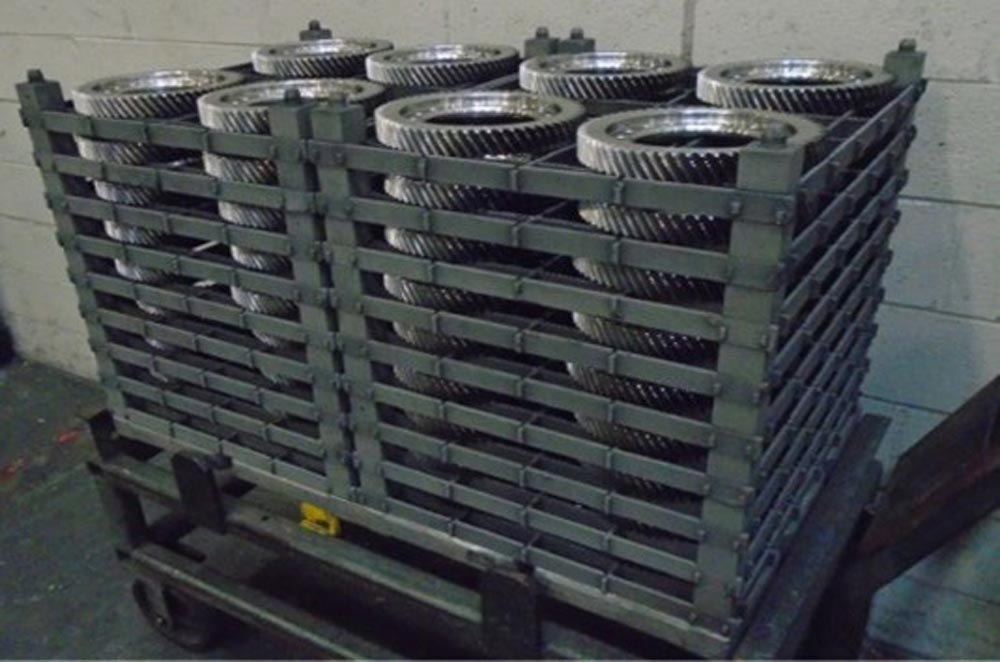
Figure 13—Final drive ring gear and production load consisting of 9 layers.
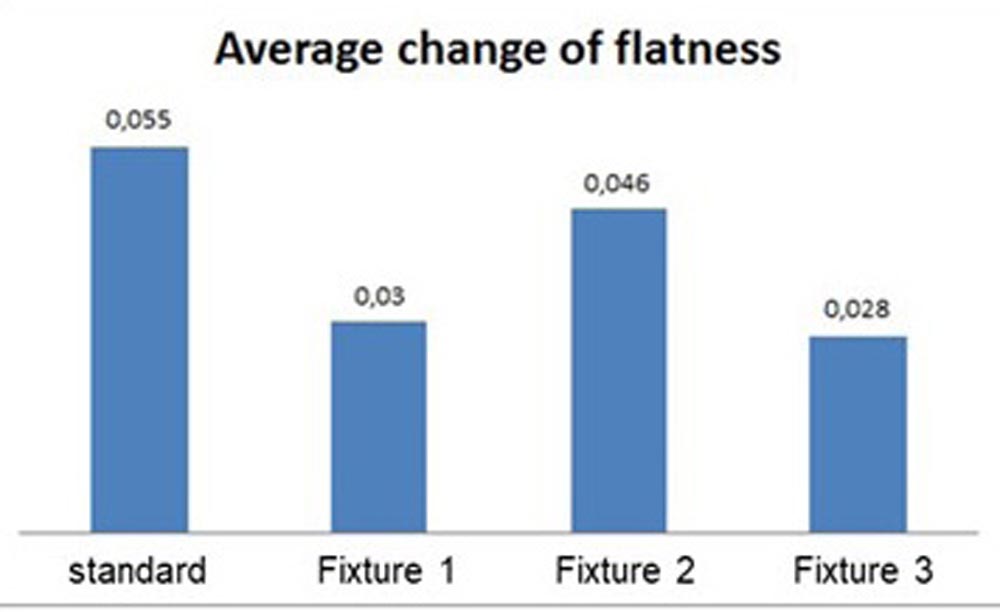
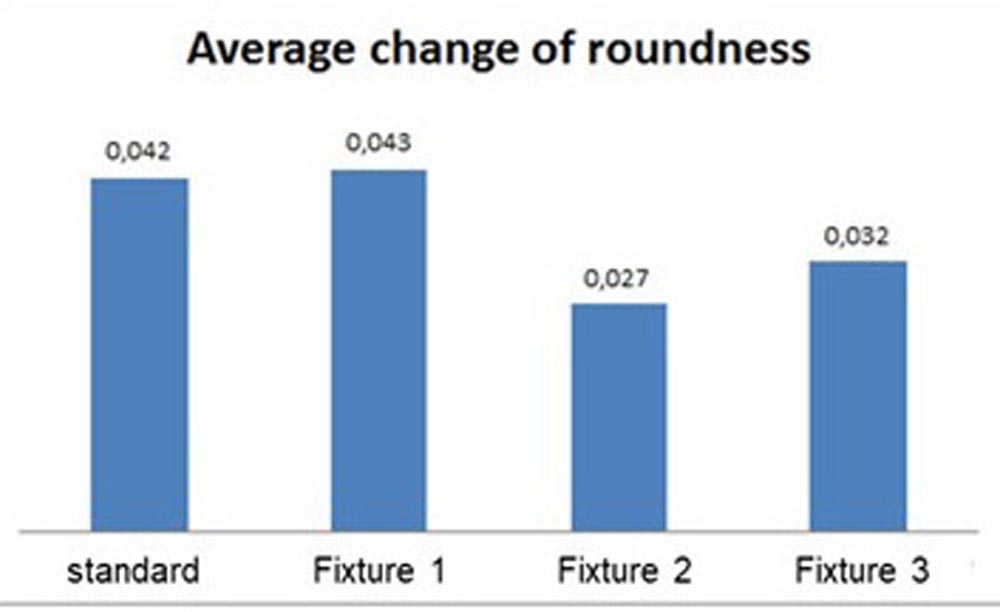
Figure 14—Change of flatness and change of roundness of final drive ring gears using different fixtures applying LPC and HPGQ.
Figure 13 shows the standard fixture which is used in serial production. Three new designs of fixturing were tested to improve distortion control.
Average change of flatness and average change of roundness are given in Figure 14. With “Fixture 3” the distortion control was clearly improved:
- Change of flatness was reduced by 49 percent.
- Change of roundness was reduced by 24 percent compared to standard fixturing.
As the new design could not be validated in a PPAP (Production part approval process), it was not yet possible to implement this improvement into serial production. However, it was demonstrated that fixture design has clear potential to improve future distortion control.
Reversing Gas Flow
The following gives an application example of the reversing gas flow process described in the “Reversing Gas Flow” section. The treated gears are made of 5120 materials, have an outer diameter of 31 mm, a height of 32 mm, and have 24 external teeth, see Figure 15. One load consists of 1.056 pieces treated in 9 layers.
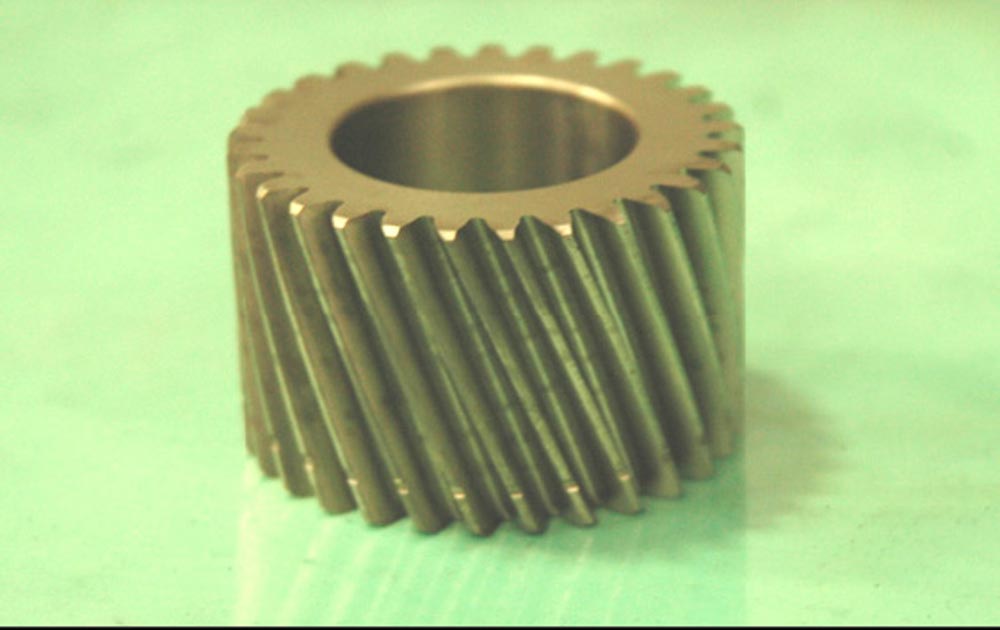
Figure 15—Final-drive pinion planetary gear (diameter = 31 mm, 24 teeth).
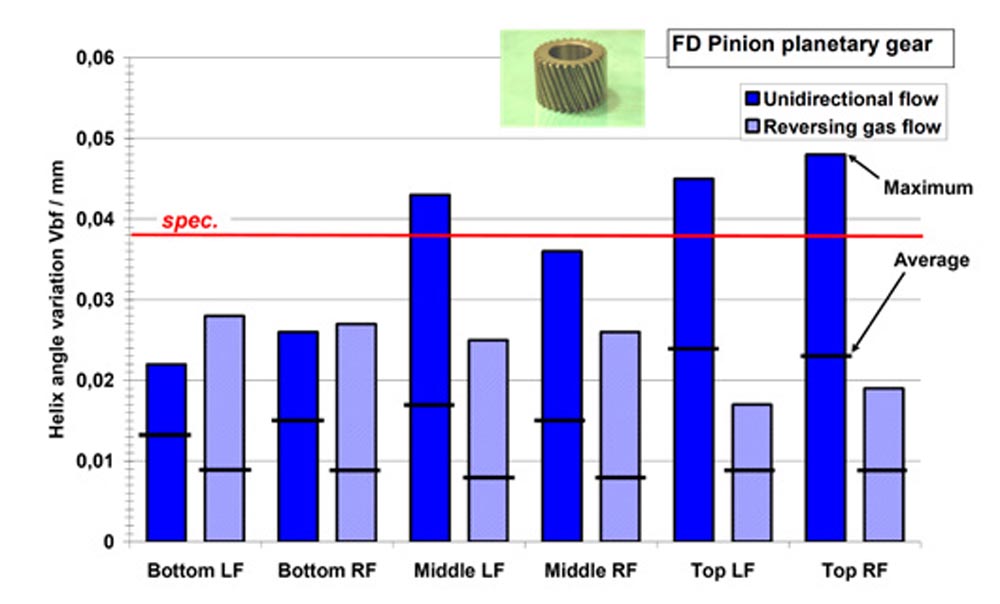
Figure 16—Reduction of distortion by application of reversing gas flow: comparison between unidirectional and reversing gas flow (helix angle variation of final-drive pinion gears after heat treatment in bottom, middle, and top layer of the load; LF = left flank; RF = right flank).
Figure 16 shows the improvement achieved when introducing the reversing gas-flow process. When applying unidirectional gas flow, the gas flows only from top-to-bottom through the load. With reversing gas flow, the flow alternates back and forth from top-to-bottom and bottom-to-top, as illustrated in Figure 5. As shown in Figure 16, with unidirectional flow, the parts in the middle and top layers of the load exhibit excessive distortion. With reversing gas flow, the helix angle variations were significantly reduced. For example, for the right flank of the gears from the top layer of the load, the maximum helix angle variation was reduced by 61 percent.
With the optimized reversing gas-flow process it is not necessary to machine the teeth of these final-drive pinion gears after heat treatment. Only the bores and faces of the gear are machined after heat treatment. This example shows the significant potential to reduce distortion by reversing gas flow.
Optimized HPGQ—Process Parameters
The distortion control of drive gears made of 20CrMnTi material was improved by optimizing the HPGQ- parameters. The gears have an outer diameter of 127 mm with 79 external teeth, a height of 12 mm, and a weight of ca. 0.3 kg, see Figure 17.
The specification after heat treatment calls for CHD = 0.5–0.8 mm, surface hardness = 58–62 HRC, and core hardness needs to be above 30 HRC.
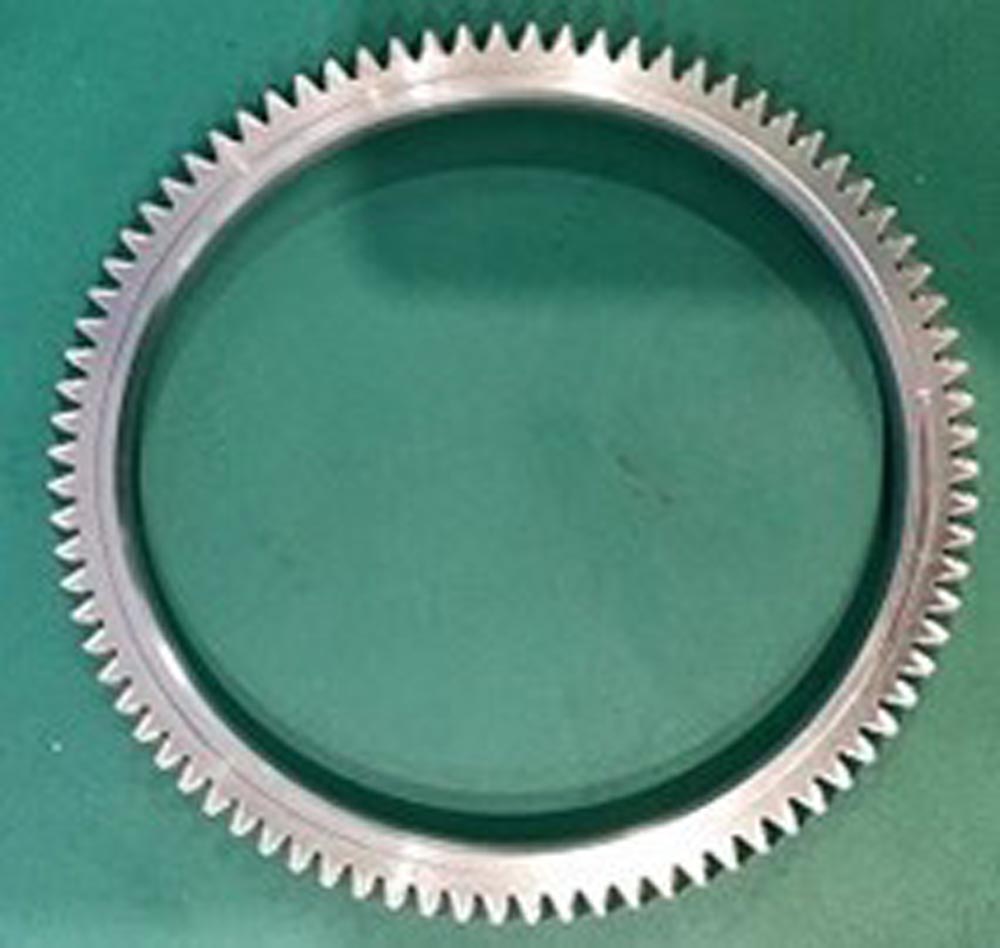
Figure 17—Drive gear.
Figure 18 shows roundness values after LPC and HPGQ. Three sets of quench parameters were tested and 100 pcs were measured in each test.
With “Quench 1” the gas flow direction was from top to bottom. With “Quench 2” the gas flow direction was changed, so that the gas is flowing from bottom to the top. This resulted in a significant reduction of roundness values. With “Quench 3” the quench intensity was slightly reduced compared to “Quench 2”, which however did not result in further improvements.
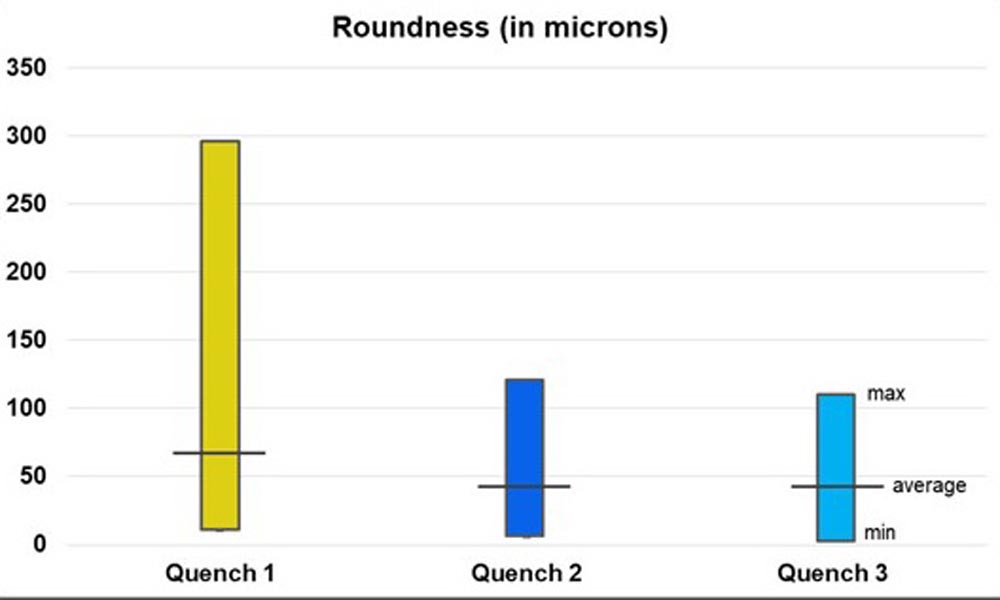
Figure 18—Roundness of drive gears with different HPGQ—parameters.
Summary
The LPC (Low-Pressure Carburizing) and HPGQ (High-Pressure Gas Quenching) process offers significant potential for advanced distortion control. The gas quenching process provides a more homogenous heat transfer coefficient on the surface of the quenched components when compared to quenching with liquids such as oil or polymers. In addition, the HPGQ process provides the flexibility to tailor the quench intensity specifically for the needs of the quenched components. The quench intensity can be tailored by defining the quench pressure (from 2 bar to 20 bar) and the gas velocity (from 2 m/s to 20 m/s).
For slide gears, it was demonstrated that distortion control was strongly improved when changing from Atmospheric carburizing and Oil Quenching to LPC and HPGQ. For the left flank, the average “Helix variation” was reduced by 59 percent, and for the right flank by 48 percent. In this application, the steel grade was changed from 8620 material to 4320H material to allow for HPGQ. This change results in higher costs for the material. However, the higher costs of material are overcompensated by the cost-savings in the field of hard machining resulting from the improved distortion control.
The size-change of pinion gears was monitored during serial production when applying LPC and HPGQ demonstrating stable shrinking of the inner diameter within a load and from load to load. On gear shafts, it was demonstrated that a homogenous size change (shrinking) of the inner splines was achieved with LPC and HPGQ.
A distortion study on final drive ring gears showed the importance of fixture design. The change of flatness was reduced by 49 percent and change of roundness was reduced by 24 percent when improving fixture design.
The HPGQ process offers further options such as “dynamic quenching” (variation of the quench intensity during the quench) or “reversing gas flow” (alternating gas flow direction during the quench) to improve distortion control.
The process modification “reversing gas flow” was applied on the final drive pinion planetary gears. With reversing gas flow, the flow alternates back and forth from top-to-bottom and bottom-to-top. By doing so, the helix angle variations were significantly reduced. For example, for the right flank of the gears from the top layer of the load, the maximum helix angle variation was reduced by 61 percent.

References
- Heeß K. et al, 2022, Size-change and form-change during heat treatment of steels (Maß- und Formänderungen infolge Wärmebehandlung von Stählen); edition #6, expert-Verlag Germany, ISBN 978-3-8169-3531-5.
- Heuer V, 2013, Chapter “Gas Quenching”; Volume 4A, ASM handbook Steel Heat treatmenting Fundamentals and Processes, ISBN 978-1-62708-011-8: 2013; pp. 222–231.
- Loeser, K.; Heuer, V.; Schmitt, G.: Selection of quench parameters for the High Pressure Gas Quenching of components made of varrious steel-grades (Auswahl geeigneter Abschreckparameter für die Gasabschreckung von Bauteilen aus verschiedenen Einsatzstählen), 2005, HTM Haerterei-Techn. Mitt. HTM # 60 (2005) 4, pp. 248–254.
- Heuer, V., Loeser, K. Schmitt, G.: Improved Materials and Enhanced Fatigue Resistance for Gear Components; AGMA Technical Paper 15FTM02, 2015. ISBN 978-1-55589-008-7.
- Stich, A., Tensi, H.M.: 1995, Heat tranfer and temperature distribution during liquid quenching, (Wärmeübertragung und Temperaturverteilung mit Benetzungsablauf beim Tauchkühlen), HTM Haerterei-Techn. Mitt. # 50 (1995) 1, pp. 31‒35.
- Heuer, V.; Loeser, K.; Faron, D.R.; Bolton, D.: Low distortion heat treatment of transmission components; AGMA Technical Paper 10FTM04, 2010. ISBN 978-1-55589-979-0.
- Altena H., Schrank, F. und Jasienski, W., 2005, Reduction of form-change on gear components in pusher-furnaces applying High Pressure Gas-Quenching (Reduzierung der Formänderung von Getriebeteilen in Gasaufkohlungs-Durchstoßanlagen durch Hochdruck-Gasabschreckung), HTM Haerterei-Techn. Mitt. # 60 (2005) 1, pp. 43–50.
- Heuer, V., Bolton, D., Friedel, J, 2021, Enhanced distortion control – ISO class 8 gears after case hardening, AGMA Technical Paper 21FTM18, ISBN 978-1-64353-112-0.
- Heuer, V., Löser, K.: Entwicklung des dynamischen Abschreckens in Hochdruck-Gasabschreckanlagen. In: Mat.-wiss. u. Werkstofftech. 34 (2003), pp. 56–63.


